Managing Your Workspace
You can manage your Workspace by clicking the Select button on the workspaces page.
Once you're in the context of that workspace the Settings sidebar option gives you the control to:
- Change the Name of your Workspace
- Change the FHIR API Provider (Linked Workspaces only)
- Manage Users who have access to that Workspace
- Manage Apps that have access to that Workspace
- Manage Data Rules for that Workspace (Linked Workspaces only)
You can delete your workspace at any time. From the Workspaces page simply select the workspace wish to delete and click on the delete button. A confirmation window will be displayed. Once confirmed, the workspace will be deleted and can no longer be used.
Manage Users
Here you can manage and invite existing workspace users.
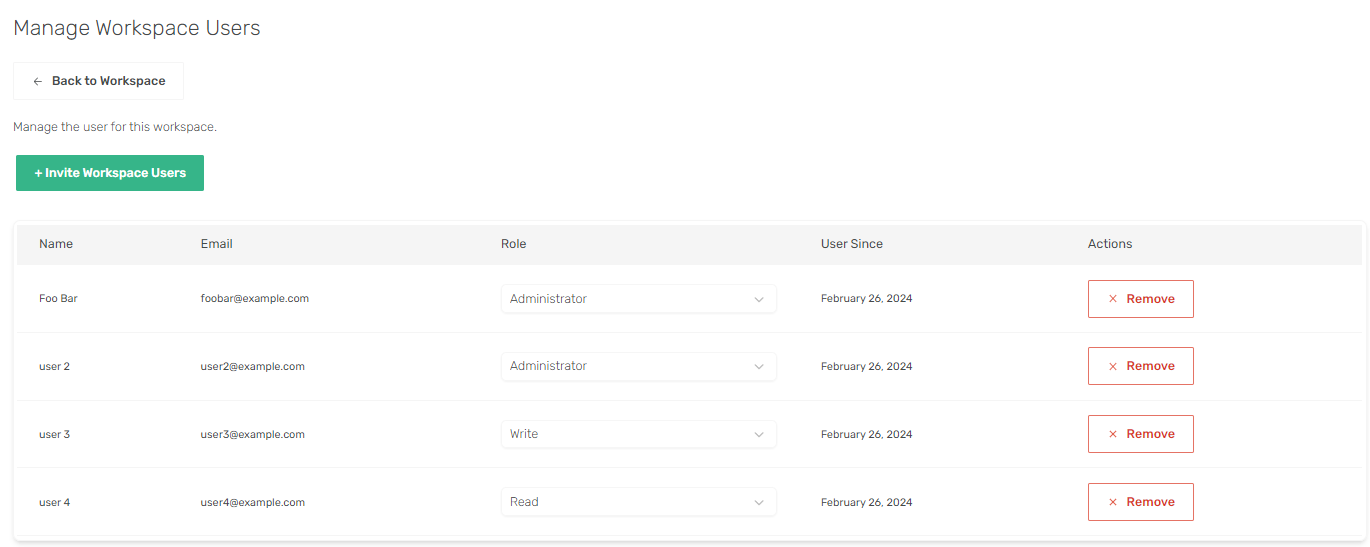
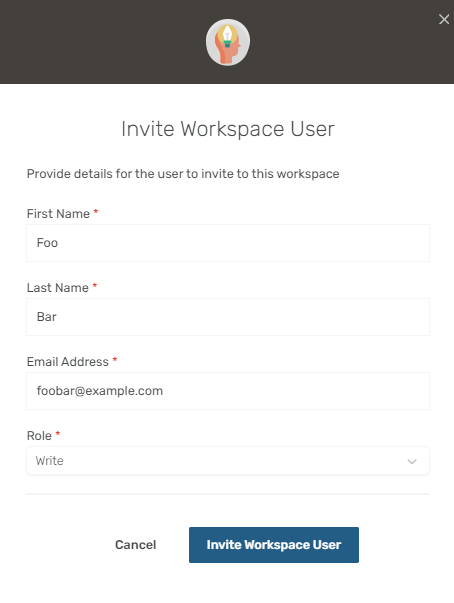
Adding a user
Currently we only support adding users to a workspace via invites.
You can do this by navigating to your desired workspace and clicking Users in the Settinngs sidebar.
A workspace user can be assigned one of these roles:
- 🛡️Administrator
- 👤User
- This role can:
- Read Data from Workspace
- Send Invites
- Write Data to Workspace
- Import Data Packages
- Manage Workspace Users
- Modify the Workspace Metadata
- Bulk Operations
- This role can:
- Read Data from Workspace
- Send Invites
- Write Data to Workspace
- Import Data Packages
Manage Apps
Select your desired workspace and click Apps in the Settinngs sidebar.
Here you can manage the applications allowed to access this workspace and the granularity of access to the workspace:
- Read: app can only
readdata from workspace. - Write: app can
read/writedata from/to workspace. - Administrator: app has full access to workspace.

Authentication
Authentication method will depend on your app type:
- System - a system application that is authenticated via client credentials OAuth flow.
- User facing (Patient/Provider) - an application that is meant to be used by a user. In the case of a regular workspace MeldRx authentication is used, when the workspace is linked, authentication is delegated to the external (linked) FHIR server.
Before authentication can be made you need to register your App as a MeldRx client. If your workspace is linked you will need to create a Linked App which is also described in the App section.
The main values that you need to note before going forward:
- MeldRx App Id - this will be used as the
client_idauthentication parameter. - MeldRx App Secret - (Optional) if you created a confidential client, you need to take note of the generated secret.
- Workspace Id - this will be used to forge the
audorissauthentication parameter.
Once you have an access token, it's added the http requests as a bearer token in authorization header, like so: Authorization: Bearer <JwtToken>
System App Authentication
For system apps the token URL endpoint is scoped to:
- Standalone workspaces:
https://app.meldrx.com/connect/token - Linked workspaces:
https://app.meldrx.com/<WorkspaceId>/connect/token
Client Credentials
Implemented as per OAuth Client Credentials RFC6749#section-4.4
The basic authentication header, as per specification, is generated by: base64(client_id + ':' + client_secret), both id and secret can be found on your MeldRx App page.
Example Curl:
curl -d "grant_type=client_credentials&scope=<Scope>" \
    -H "Authorization: Basic <BasicAuthenticationHeader>"
    -X POST https://app.meldrx.com/<WorkspaceId>/connect/token
JWKS Secret Type
Implemented as per SMART Backend Service
When generating the authentication JWT accorting to the above specification, fill the following values:
client_id- your MeldRx App Idaud- token URL endpointhttps://app.meldrx.com/<WorkspaceId>/connect/token
Example Curl:
curl -d '{"grant_type":"client_credentials","client_assertion_type":"urn:ietf:params:oauth:client-assertion-type:jwt-bearer","client_assertion": "<GENERATED JWT>"}' \
    -H "Content-Type: application/json" \
    -X POST https://app.meldrx.com/<WorkspaceId>/connect/token
User Facing App Authentication
Examples of user facing app authentication can be found in App Templates
When redirecting the use for authentication, set the following parameters:
client_id- your MeldRx App Idiss- your workspace URL,https://app.meldrx.com/api/fhir/<WorkspaceId>redirectUri- should be the one of the Redirect Uris specified on your MeldRx Appscope- same scopes as defined on your MeldRx App
Access Workspace
Before you can access a workspace you will need to obtain an access token. For more information about the access token, reference the Authentication section.
Hint: For a quick test, you can access the unauthenticated metadata endpoint for that workspace on: https://app.meldrx.com/api/fhir/<WorkspaceId>/metadata
Once authenticated, here are some simple read operations that can be performed:
Read Patient
curl -H "Authorization: Bearer <JwtToken>" \
    https://app.meldrx.com/api/fhir/<WorkspaceId>/Patient/<PatientId>
Search Patients
curl -H "Authorization: Bearer <JwtToken>" \
    https://app.meldrx.com/api/fhir/<WorkspaceId>/Patient
Linked Workspace Access / Data Rules
Linked workspaces can be configured to get data from either the MeldRx environment or the external (linked) FHIR environment.
By default requests are routed to:
- read - MeldRx environment
- search - external FHIR environment
- create - MeldRx environment
- update - MeldRx environment
- delete - MeldRx environment
- $operations - are performed as searches, so they will be routed externally
Configure request routing
Before we begin, note that a request for Observations https://app.meldrx.com/api/fhir/<WorkspaceId>/Observation would search all observations on the external FHIR environmnet. (ignore the category requirement for breviety)
- Go to your workspaces (
MeldRx > Workspaces) - Open the desired workspace by pressing the
Selectbutton. - Select
Data Rulesin the Settings sidebar - Collapse the
Bulk Updatestab Trigger Actionset toReadResource Typesearch forObservationAction Targetset toMeldRxorBoth- Click
Update Rules
After this configuration is updated, the request for Observations https://app.meldrx.com/api/fhir/<WorkspaceId>/Observation would search all observations in the Data Vault if the Action Target is set to MeldRx. If Both was selected it would search both the MeldRx Data Vault and the external FHIR environment and return 2 bundles.
Using this Data Rule we can extend existing observations about a patient in the external FHIR environment, and start adding the ones in the MeldRx environment.